Trending TikTok Phone Photo Editing Formula Gives Dull, Backlit Photos A Vivid, Soft & Dreamy Aesthetic
Whether you're always on TikTok or the kind who can't fathom why anyone would enjoy swiping through random short videos, there's no denying that the platform is the place for entertaining trends like the DIY Korean-style curtain bangs and Dr Jart cream that doubles as a foundation.
Recently, phone photo editing formulas that look too good to be true have been popping up on my feed and I decided to put them to the test.
Keep reading to find out more!
There are various photo editing formulas floating around the platform, so I picked out a few to try and found one that worked the best.
The beauty of this formula is that it allows noobs to edit photos from phones conveniently and for free. It produces pretty decent results that look like it was edited on Photoshop.
 Photo from GirlStyle Singapore
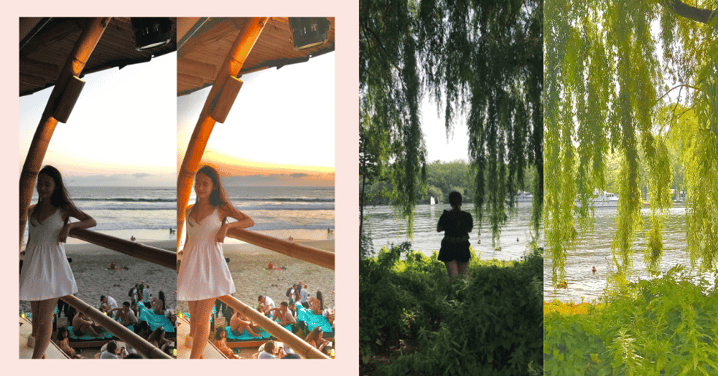
The editing trick was designed for backlit photos where the background is bright and the subject isn't in focus. With a few easy adjustments, the light and dark contrast is reduced and the photo has a soft, dreamy look with vivid colours.
 Photo from GirlStyle Singapore
 Photo from GirlStyle Singapore
I edited my photos on an iPhone but it'll work on other phones as well.
Editing formula:
Exposure: 15
Brilliance: 87
Highlight: -15
Shadows: 60
Contrast: -60
Brightness: -15
Black point: -15
Saturation: 70
Vibrancy: -30
Warmth: 35
Tint: 20
Sharpness: 18
Definition: 18
Noise reduction: 12
While this editing trick worked best on greenery and sunsets, it also enhanced other outdoor photos well, like this one at the Clock Tower at Victoria Theatre.
 Photo from GirlStyle Singapore
It comes in handy for low light photos too! My dull photo at the hot pot in a tent restaurant took on a more whimsical, Pinterest-worthy aesthetic after going through the editing formula.
 Photo from GirlStyle Singapore
The formula doesn't fare as well for indoor photos, even if it mimics the outdoors with faux nature elements. Take this photo at Gram Cafe for example, it's more vibrant and I look less underexposed, but overall, the photo is rather unnatural-looking. Dialling down the saturation from 70 to 30 (rightmost photo) seemed to fix it!
 Photo from GirlStyle Singapore
More photography tips:
Share this article with your friends!
Text by: GirlStyle SG


